11
Sep
12

Outlook will not open attachments with specific file names

Sometimes, when you’re trying to open an attachement from Outlook, it will refuse to do so, telling you something about insufficient disk space or lack of permissions. This will almost always happen with an attachment filename that you’ve opened many times before. For example, when you receive a weekly report called “Weekly Report.xls”.

Everytime you open a file, Outlook creates a local copy of the file in a temp folder. Next time you will open a file with the same name, it will add a (02) in the file name and so on, until it reaches (99). After that, it will not let you open the file. The solution to this annoying problem is actually pretty simple. All you need to do, is empty the temp folder and restart Outlook.

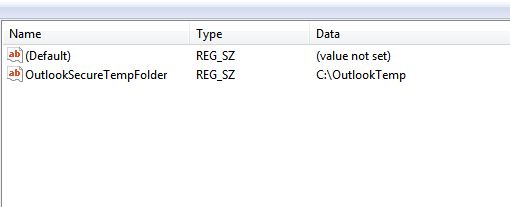
In order to do so, open up Registry Editor* and locate the following key: OutlookSecureTempFolder. 
You can either CTRL+F to find it, or navigate to HKEY_CURRENT_USER\Software\Microsoft\Office\11.0\Outlook\Security. Please note that 11.o refers to Office 2003. I don’t know whether this problem continues to appear in newer Office versions, but if you come accross it, instead of 11.0, you are looking for a 14.0.

Double click on the key, and copy the folder location. Now paste this in an explorer window and open the folder. Select all the files in there, delete them and restart Outlook. You’re done. Simple enough yes? This is a well known problem and it has been documented many times already.

While easy to solve, this problem can become really annoying when it appears often. So we are going to make our lives a bit simpler and automate this proccess.

First, we need to change the folder’s location to somethig simpler. I created a folder named “OutlookTemp” and changed the registry key to the new location.

In order for our changes to take effect, we need to restart our computer. Do that and then open Outlook. Find a couple of emails with attachements and open them. Now, if you navigate to the folder you selected as your new Outlook temp folder, you will see that there are already some files in there.

In the image above you notice that I opened the same attachment twice and it created second file.

If you are using a program to maintain your computer, such as CCleaner or System Mechanic, there might be an option to include this folder, so it will be cleaned up automatically. Since I don’t use such programs, I found a simple script that performs just this task:

set folder=”C:\OutlookTemp”
cd /d %folder%
for /F “delims=” %%i in (‘dir /b’) do (rmdir “%%i” /s/q || del “%%i” /s/q)
All you need to do is put the three lines above in a text file, save it as OutlookTempClean.bat (or any other name you like) and you are ready to go.
If you so wish, you can schedule this batch file to run once a month, or whenever you feel like) and you will not have to worry yourself again.
*I hope you understand that messing around with Registry Editor can cause problems with your computer and you need to be really careful. Yes, treat this sentence as a disclaimer.
17
Aug
12

Strange Behaviour In Table Control [ABAP]

What I am about to describe, has been happening with all table controls I have ever implemented. Unfortunately, I have no idea why this is happening but none the less I decided to put it here in case someone else has noticed it.

Here’s the scenario: I have the following table control that fills with an internal table. Nothing fancy. Oh, if it matters, I created it using the wizard.

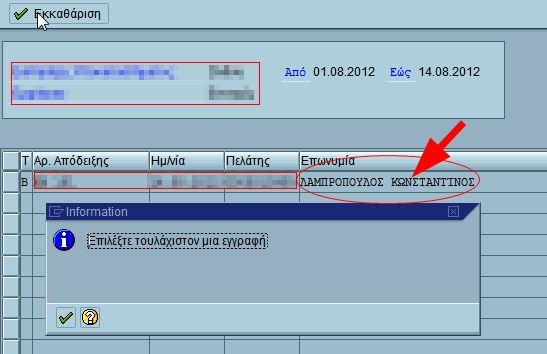
Right next to the obfuscated part, you will notice my name written in both caps and small letters. Now watch what happens when I press the button (ie invoking the USER_COMMAND

See that? My name changed to all caps for some reason! As soon as I close the message box and return to the screen, my name changes back to normal.

So, if you happen to stumble across this post and have any idea why this is happening, I’d really appreciate a comment. I know it’s not big deal but I’m curious as to why it’s happening.

14
Apr
12

How to have Twitter when you’re not allowed to have Twitter.

Due to a change in our network security policy, I lost access to Twitter. To be accurate, I lost access to a lot of websites and services, but what really cost me was Twitter. I don’t mind not being able to watch Youtube, I don’t mind losing access to services like Yousendit or Wetransfer (although I got to admit this can make my life a bit more difficult at times), but Twitter was too much. So, I decided to find a way to be able to use Twitter while at work.

Disclaimer: What I did could be considered a violation of company policy. Although it’s good for educational purposes, please consider talking to whoever is responsible for your network.

Before I go any further, let me describe the situation a little bit better. What we use is a type of DNS Blacklisting. I am fairly sure that except from blocking and redirecting DNS requests, there’s also IP blacklisting, since I was not able to access blocked sites even when I tried using the IP in a browser. Besides that, port #53 is also blocked, so the standard “ok use another dns server like 8.8.8.8 (Google’s main dns server)” tip, forum members and internet gurus tend to give you, does not work.

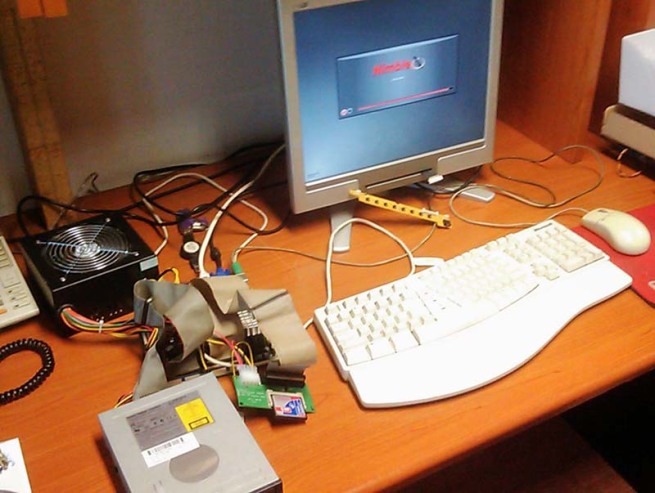
Fortunately, DynDNS domains were not blocked. My good old VIA EPIA would do the rest. This time, I decided to take an extra step to making it silent and decided not to use an HDD. Instead I used an 1GB Compact Flash where I mounted /boot and swap space and an 8GB usb flash drive for the rest of the installation. I chose to go with Xubuntu after trying Damn Small Linux and Nimblex, just because I feel more comfortable with Ubuntu. I have to warn you that what I did was probably not a very bright idea. Both CF and the usb are very slow, but for my purpose it is just fine.

After I finished installing, I set up SSH (check to see if it’s legal where you live), SAMBA and then, the most brilliant program ever written: TTYtter. A console Twitter client!

So, the only thing I have to do, is fire up puTTY, connect to the VIA and enjoy a nice Twitter session. It really took my some time to getting used to it, but I assure you despite the fact that it’s command line only, it is more than usable. Yeah I know, my award for the most ridiculous solution will soon be delivered, but in my defense, what I did is a lot faster than using remote desktop or vnc.

If you cannot live without a proper Twitter client (or another piece of software with a gui for that matter), consider running a remote X-Server. If you are on a Windows machine try messing around with cygwin, but expect no help from me. If you have access to a Linux box however, the only thing you need to do is run ssh with the -X  (ssh -X username@server)parameter. Sweet, huh? Combine that with a sweet little program called screen and you will be able to run as many programs as you want.

Have fun!

16
Mar
12

Installing Windows Home Server 2011 on an SSD

While I personally see absolutelly no reason to have WHS around, there seems to be a lot of people who do. One of those, a relative, called me the other day because his box was so slow that was almost unresponsive.

I tracked down the problem to a faulty HDD, so I told him to go buy a new one and we would set up the machine from the beginning. Although my instructions were clear, instead of buying a SATA disk, he went ahead and bought a 120 GB SSD, because and I quote “They are faster”.

At this point I have a confession to make. I never intended to make a fresh install. I was hoping I could clone the old disk (it was not completely bust) onto the new one and save me from a lot of work. I have used this tactic before, but only from smaller to larger disks. I knew there were ways to clone on a smaller disk, so I thought to give it a go.

After I had successfully cloned the old disk on the SSD, I put it back on the server, and – as you might have expected – it refused to boot. The message I was seeing was something about a device that was not found and it prompted me to repair the installation from the Windows CD. I was never able to do that mind you. The reason?

For some reason, Microsoft has decided that you need at least 160GB in order to installl WHS.

That’s right. For a 10-12 GB installation, your HDD needs to be at least 160 GB. Well done Microsoft! As you probably guessed, there are a lot of people with the same problem and thankfully there is a solution.

Windows Home Server (as other versions of Windows) can be installed unattended with the use of a special text file called answer file. Sean Daniel has written an excellent post on how to do that and I can testify that following his post, I was able to install WHS on a smaller disk.

Although Sean is talking about a specific piece of hardware, I assure you this method works perfectly. Make sure that the drive you want to install to is formatted!

05
Mar
12

Windows 8 CP: Activation and DotNet 3.5

Image

When Windows 8 Developer Preview came out, I downloaded and installed them on a spare PC to check them out. Appart from getting a genral feel of the new Metro UI and fooling around, there was not much else to do, so I quickly set that PC aside and went back to my everyday life.

A few days ago though, Consuper Preview came out. Big news, right? So naturally, I downloaded the iso from here, brought back that spare PC and installed. I was expecting to see some changes and changes I did see.

First of all, it looks more like an operating system compared to DP (oh come on, I can’t be the only one who smiled right now) which looked like a demo of an OS. Web Store is now functional, with a good deal of apps to try out, but most importantly you now have solitaire available! That’s right. You don’t have proper Windows, unless you can play a game of solitaire.

I do not plan to go into much detail about Windows 8 themselves. Over the last few days, there has been a ton of reviews, presentations and posts about them, so whatever it might have been that I wanted to say, it has probably already been said. However, one thing that stuck into my mind the first time (with Developer Preview) and did not change, was that Windows 8 would be great for a tablet, or something with a touch screen in general, but I don’t think I could get used to this style of working on a daily basis. 

Anyway, I have a couple of tips for you, hoping to save you some time and frustration.

1) Install Microsoft Dot Net 3.5 (or 2.0)

One of the first things I had to do, was to install Mouse Without Borders, a nice little program straight out of the Microsoft Garage, that allows you to control many PCs with the same keyboard/mouse. Unfortunatelly, MWB requires DotNet 2.0, while Windows 8 come with version 4.0. For some reason, unknown to me and although there was nothing wrong with my internet connection, I could not seem to be able to download DotNet. Searching for a solution, I came across this post. What worked, was not the procedure describesd in the post, but what a comenter suggested. Open an elevated command prompt and type:

dism /online /enable-feature /featurename:NetFx3 /all /source:YourWindowsCDPath\sources\sxs. HTH

You are good to go.

2) Activate Windows

Make sure your date and time are set correctly, otherwise you will never activate your copy. Simple, but I spent a good amount of time trying to figure out what was going on, before I thought of checking the time.


04
Oct
11

Mounting External HDDs at Startup on OpenSuse

OpenSUSE 11.2

Image via Wikipedia

Although Linux Mint will be my favorite flavor of Linux, I am trying hard to give OpenSuse a chance. Last month, I was telling you about a couple of small annoying things I came across on OpenSuse and how to “correct” them. Since then, I switched back to Mint and back to OpenSuse (since yesterday) and I’m hoping to stick to one particular OS for a while, because frankly, it’s becoming some kind of habit…

Anyway, back to our topic. Now I know what most of you are thinking: “Why the hell do we need instructions on how to mount an external HDD? Since the Dark Ages, you have your standard plug n play on Linux mister! Pop it in and all your files are there!” Well, yes, but as it usually happens, mine was a slightly different case than usual. Yeah I know, I got to do something about it.

I have three external hard disks, which host most of my entertainment. These are permanently hooked on my PC and I want them shared via Samba, so I can access them through a Windows 7 box that acts as my current Media Center. For an explanation on why I am using Windows and not XBMC with Linux, have a look at this post. As you probably guessed, the disks are formatted in NTFS and this is what complicates matters.

In case my disks were formatted in a Linux format, such as ext4, things would be simple enough: I would choose to automount them in KDE (I think Gnome has a similar option) and every time I turned my PC on, they would be mounted in /media folder under folders matching their label. Then, I could set up file sharing as usual and everybody would be happy.

NTFS, does not support the same permissions as extended file system. This means that upon mount, Linux applies “fake” file permissions which you cannot change! If you were using ext4 for example, you could easily chmod the files to suit your needs, but in this case, although chmod will report nothing strange, no actual changes were made. Even so, for most of you this will not be a problem, since you will be the only one using this disk and by default you are the owner, so you can do pretty much everything. In my case, I wanted to be able to allow read/write access not only to myself, but to all members of my group too. So here’s what I did:

Since automount through KDE was not good for me, I had to do it the old fashioned way, by adding entries in fstab. First I created a folder for each of my drives under root and gave them the appropriate permissions:

sudo mkdir /Videos
sudo chown -R rosenred /Videos
sudo chgrp -Rv users /Videos

Now, we need to add the mount commands in fstab. The safest way to go, is with each disk’s uuid, a unique identifier that will remain stable even if drive letters change. So we need to find our what is the uuid of our disk:

sudo /sbin/blkid

In case you followed my advice (or are using a different distro) you don’t need to add the /sbin to the command. Write down the uuid of your disk and then edit /etc/fstab using your favorite editor and add the following line:

/dev/disk/by-uuid/7A7ACDEA7ACDA2ED /Videos       ntfs-3g users,locale=en_US.utf8,uid=rosenred,gid=users 0 0

If you wish to add more than one disks, add more lines to fstab accordingly. Reboot and hopefully everything will work just fine.

I don’t plan on writing a separate post about how to configure Samba, there are a ton of tutorials on the subject, however I have one tip that might save you a lot of money from a broken screen/desk/wall:

If you set everything up and for some reason Windows refuses to see the shared directories, go to YAST and disable AppArmor. I know, makes little sense, but apparently it’s a bug in OpenSuse 11.4 as I found out here.

05
Sep
11

Migrating to Linux pt.2: Annoyances

SuSE logo

Image via Wikipedia

It’s been a while since the first part of this series, but my plans have drastically changed. In two months I have changed my OS three times: I tried Ubuntu, Kubuntu and settled down to OpenSuse for the time being. Last night, I was trying to restrain myself from installing Fedora and then it became crystal clear that I am in no position to write such a series of posts. Following me, not only you will not migrate to Linux, you face the danger of not migrating to anything! So I decided there will be no part three, I will sum it up and move to writing something of more essence.

As soon as the installation of OpenSuse finished, I noticed a couple of things I didn’t like. I understand that Ubuntu and Suse are different, probably there’s a whole different philosophy behind each, but we are talking about my home PC, where only I have access. I am willing to sacrifice some security for comfort and if you chose to follow the solutions presented here, so should you.

First thing I noticed, was that /sbin was not in  the user path. So, in order to run ifconfig for example, I had to type:

sudo /sbin/ifconfig eth0

One could argue that this is supposed to be this way, because a user does not need to execute commands in sbin. While this might be true, I am not a user on my machine and I am perfectly capable of running whatever command I wish! I did not want to run everything as root (ie, using sudo su), so I found this simple solution:

In your home folder there’s a file named .profile which should be edited to include the following line: export PATH=$PATH:/sbin:

Now, every time you log in, the export path command will be executed and you will have the sbin commands at your disposal. Note, that this affects only your user, so it is relatively safe.

Next item on my list was some very weird behavior when mounting an internal HDD. I was required to give the administrator’s password every time I wanted to access an internal drive (in ext4 format). My external drives (formatted in NTFS) had no problem whatsoever and I was really really annoyed. A little bit of digging in the OpenSuse forums yielded a solution:

Open and edit the following file: /var/lib/polkit-1/localauthority/10-vendor.d/org.freedesktop.udisks.filesystem-mount-system-internal.pkla

Locate this line:  ResultActive=auth_admin_keep and change it to this: ResultActive=yes

That’s it.

I still have some way to go, before my installation is what I want it to be, there are things to tweak, things to fix and things to get used to. I am not entirely sure I will stick with OpenSuse for long, but KDE 4 is quite fun.


29
Jul
11

PDF Complete messes up Office 2003

Many of you have come across the need to convert a Word document to pdf. There are many approaches to this, both free and paid, one of which is

PDF Complete (paid). Some of our HP computers at work, came with PDF Complete pre-installed, but it was actually a trial version. At some point it expired, but no user complained about pop ups to buy the full version, or anything at all in fact (as you guessed they never needed to make a pdf).

A few days ago, one user came to me with a very strange problem: She wanted to write an email, but when she switched the keyboard language to Greek, she could not write. Between you and me I did not believe her, until I saw it with my own eyes. In every Office component, you could only write in English. As soon as you change the language, you could not write anything unless you typed a symbol first! Then after a couple of characters, it would stop and you had to type another symbol.

Having forgotten all about PDF Complete, my mind started going to a corrupted Office installation. Thankfully a colleague noticed that PDF Complete had expired and uninstalled it. Then as if by magic, everything worked fine.

Major fail…

24
Jul
11

Share Files Between Mint 11 and Windows 7

Logo Linux Mint

Image via Wikipedia

While what I got today is nothing serious, nothing that has not been extensively documented elsewhere, I thought I’d sum up all the necessary steps in one place to save somebody the trouble of looking into many different websites to accomplice a relatively simple task.

The Story: I have three external drives on my PC (now running Linux Mint 11) that I needed to be able to access from a Windows 7 machine, serving the role of my Media Center. You can read why I chose Win7 for Media Center here.

The problem: I could not activate File Sharing on Mint. The option under “Preferences”, “Personal File Sharing” was grayed out.

The Solution: For some reason, completely unknown to me, you need to install a couple of Apache packages first. Insane, I know, but that’s what Jeffrey Charles suggested over at Beyond Technically Correct and I had no reason to doubt him. So open a terminal and type:

sudo apt-get install apache2.2-bin libapache2-mod-dnssd

After installation was finished, I rebooted my machine (not sure whether I needed to do that or not) and finally I was able to enable Personal File sharing. I went to my three disks, I created the shares and then I went to my Windows machine and tried to add them as network drives. Guess what? No luck. Fortunately, I remembered that the last time I had set up a Samba server, I needed to make a couple of changes in a file somewhere. In case you are wondering, when you check the checkbox to enable file sharing, what you really do is set up a Samba server on your machine.

You need to edit the following file to reflect your own network: /etc/samba/smb.conf

Locate the line bellow and change WORKGROUP to the name of your workgroup. If you never changed that, you do not need to do anything here.

# Change this to the workgroup/NT-domain name your Samba server will part of
   workgroup = WORKGROUP
What I did next, was to scroll a bit down and locate the authentication section. Then, I uncommented the security = user line. Remember, if you do that, you need to make additional user accounts on your machine, for every other user you want to allow to access your shared folders.
# "security = user" is always a good idea. This will require a Unix account
# in this server for every user accessing the server. See
# /usr/share/doc/samba-doc/htmldocs/Samba3-HOWTO/ServerType.html
# in the samba-doc package for details.
   security = user

The last step you need to take, is add the allowed users to Samba. Open a terminal and type:

sudo smbpasswd -a [username]

Please note that in case you enabled the security = user option above, you will have to provide a username that can also log on to your machine. I added myself for example.

Edit: I forgot to mention that after you change the configuration file you need to restart Samba, for the changes to take effect. you can do that by typing in a terminal “sudo service smbd restart” or by restarting your machine.

That’s it. I was then able to access my drives from Windows and mount them as Network drives.


April 2024
M T W T F S S
1234567
891011121314
15161718192021
22232425262728
2930